Using DHT22 Temperature/Humidity Sensor
In this video, I'll show you how to connect your ESP32 or any Arduino board to a DHT22 temperature and humidity sensor (sometimes also referred to as AM2302).
Wiring
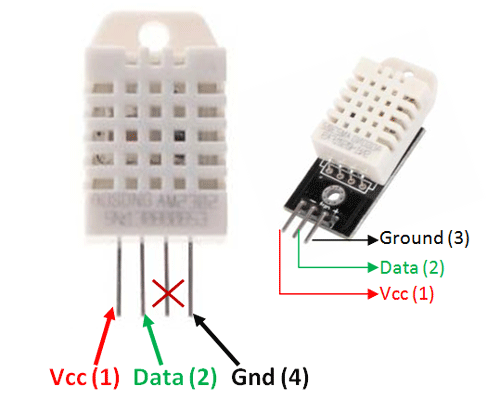
Let's start with the wiring. My sensor comes on a little PCB with three pins: 3V input, ground, and a data pin. Connecting it to your board is really simple, give it 3V of power, connect ground to ground, and connect the data pin to one of the GPIO pins on your board. I choose pin number 5.
If your DHT22 sensor isn't attached to a PCB, you'll have 4 pins instead of 3. In that case, you can ignore the third pin and connect power, data, and ground in this way:

Once it's connect, you can use the DHT Sensor library to interface with the sensor! No need to write that code yourself.
Start by adding it as a dependency to your platformio.ini file:
lib_deps =
    DHT sensor library
To make temperature and humidity readings:
#include <Arduino.h>
#include <Wire.h>
#include <SPI.h>
#include <DHT.h>

DHT dht(5, DHT22);

float humidity, temperature;

void setup() {
  Serial.begin(9600);
  dht.begin();
}

void loop() {
  humidity = dht.readHumidity();
  temperature = dht.readTemperature();

  Serial.print("Temperature: ");
  Serial.print(temperature);
  Serial.print("°C / Humidity: ");
  Serial.print(humidity);
  Serial.println("%");

  delay(2000);
}
Flash this to your board and you'll see a new temperature & humidity reading every 2 seconds.
Be careful though: measuring too fast will cause the sensor to heat up, which will skew your results.

