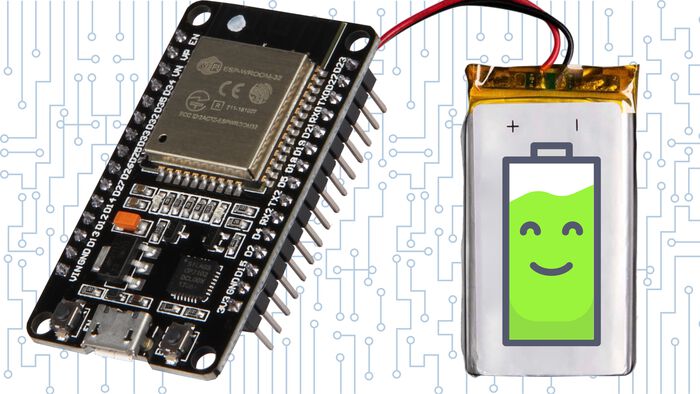
Connect ESP32 to AWS IoT (with Arduino code)
Lately, I’ve been building some IoT devices and every time I used the ESP32 micro-controller. It's a powerful micro-controller and has built-in WiFi, which means I can connect it to AWS IoT to send sensor data to the cloud for processing and safe-keeping.
This post will show you how to connect your ESP32 with AWS IoT. Unleash the power of the cloud!
Note: this project will not use the AWS IoT SDK or Mongoose or FreeRTOS. Just a combination of Arduino libraries to stitch everything together.
First things first: WiFi
Before we can connect to AWS, the ESP32 needs an active internet connection. So let’s start by writing some code to connect to a WiFi network. Feel free to skip this step if you already got this.
I usually define the WiFi credentials at the top of the file so they’re easy to change, should it be required:
#include "WiFi.h"

// Wifi credentials
const char *WIFI_SSID = "YOUR WIFI NETWORK NAME";
const char *WIFI_PASSWORD = "WIFI PASSWORD";
Then we can write a simple function that tries to connect to the given network:
void connectToWiFi()
{
  WiFi.mode(WIFI_STA);
  WiFi.begin(WIFI_SSID, WIFI_PASSWORD);

  // Only try 15 times to connect to the WiFi
  int retries = 0;
  while (WiFi.status() != WL_CONNECTED && retries < 15){
    delay(500);
    Serial.print(".");
    retries++;
  }

  // If we still couldn't connect to the WiFi, go to deep sleep for a minute and try again.
  if(WiFi.status() != WL_CONNECTED){
    esp_sleep_enable_timer_wakeup(1 * 60L * 1000000L);
    esp_deep_sleep_start();
  }
}
This particular function will try 15 times to connect and if it fails will make the ESP32 go into deep sleep mode for a minute. This is to prevent the micro-controller from being stuck trying to connect to WiFi (and potentially draining a battery). But feel to customize it as you see fit.
Provisioning a certificate
Next up: registering your device with AWS and creating a certificate for it. Amazon’s IoT service is secure by default and requires each device to have a unique certificate. This certificate not only encrypts the data that the device sends but also provides a way for you to block devices.
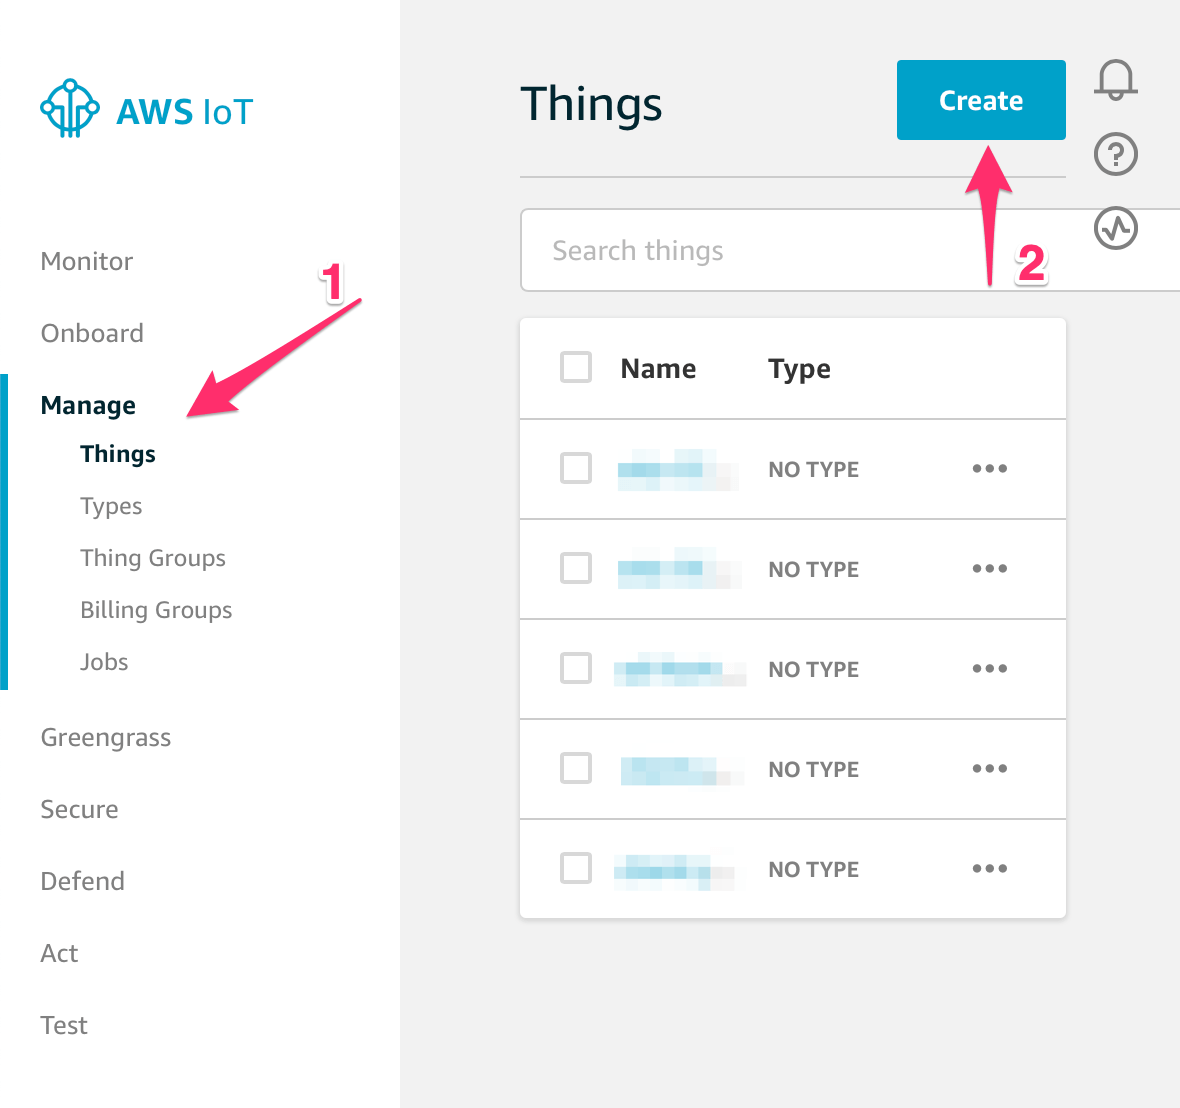
Start by logging into the AWS console and navigating to the IoT Core console. In here, go to "Manage > Things" and click on the "Create" button.
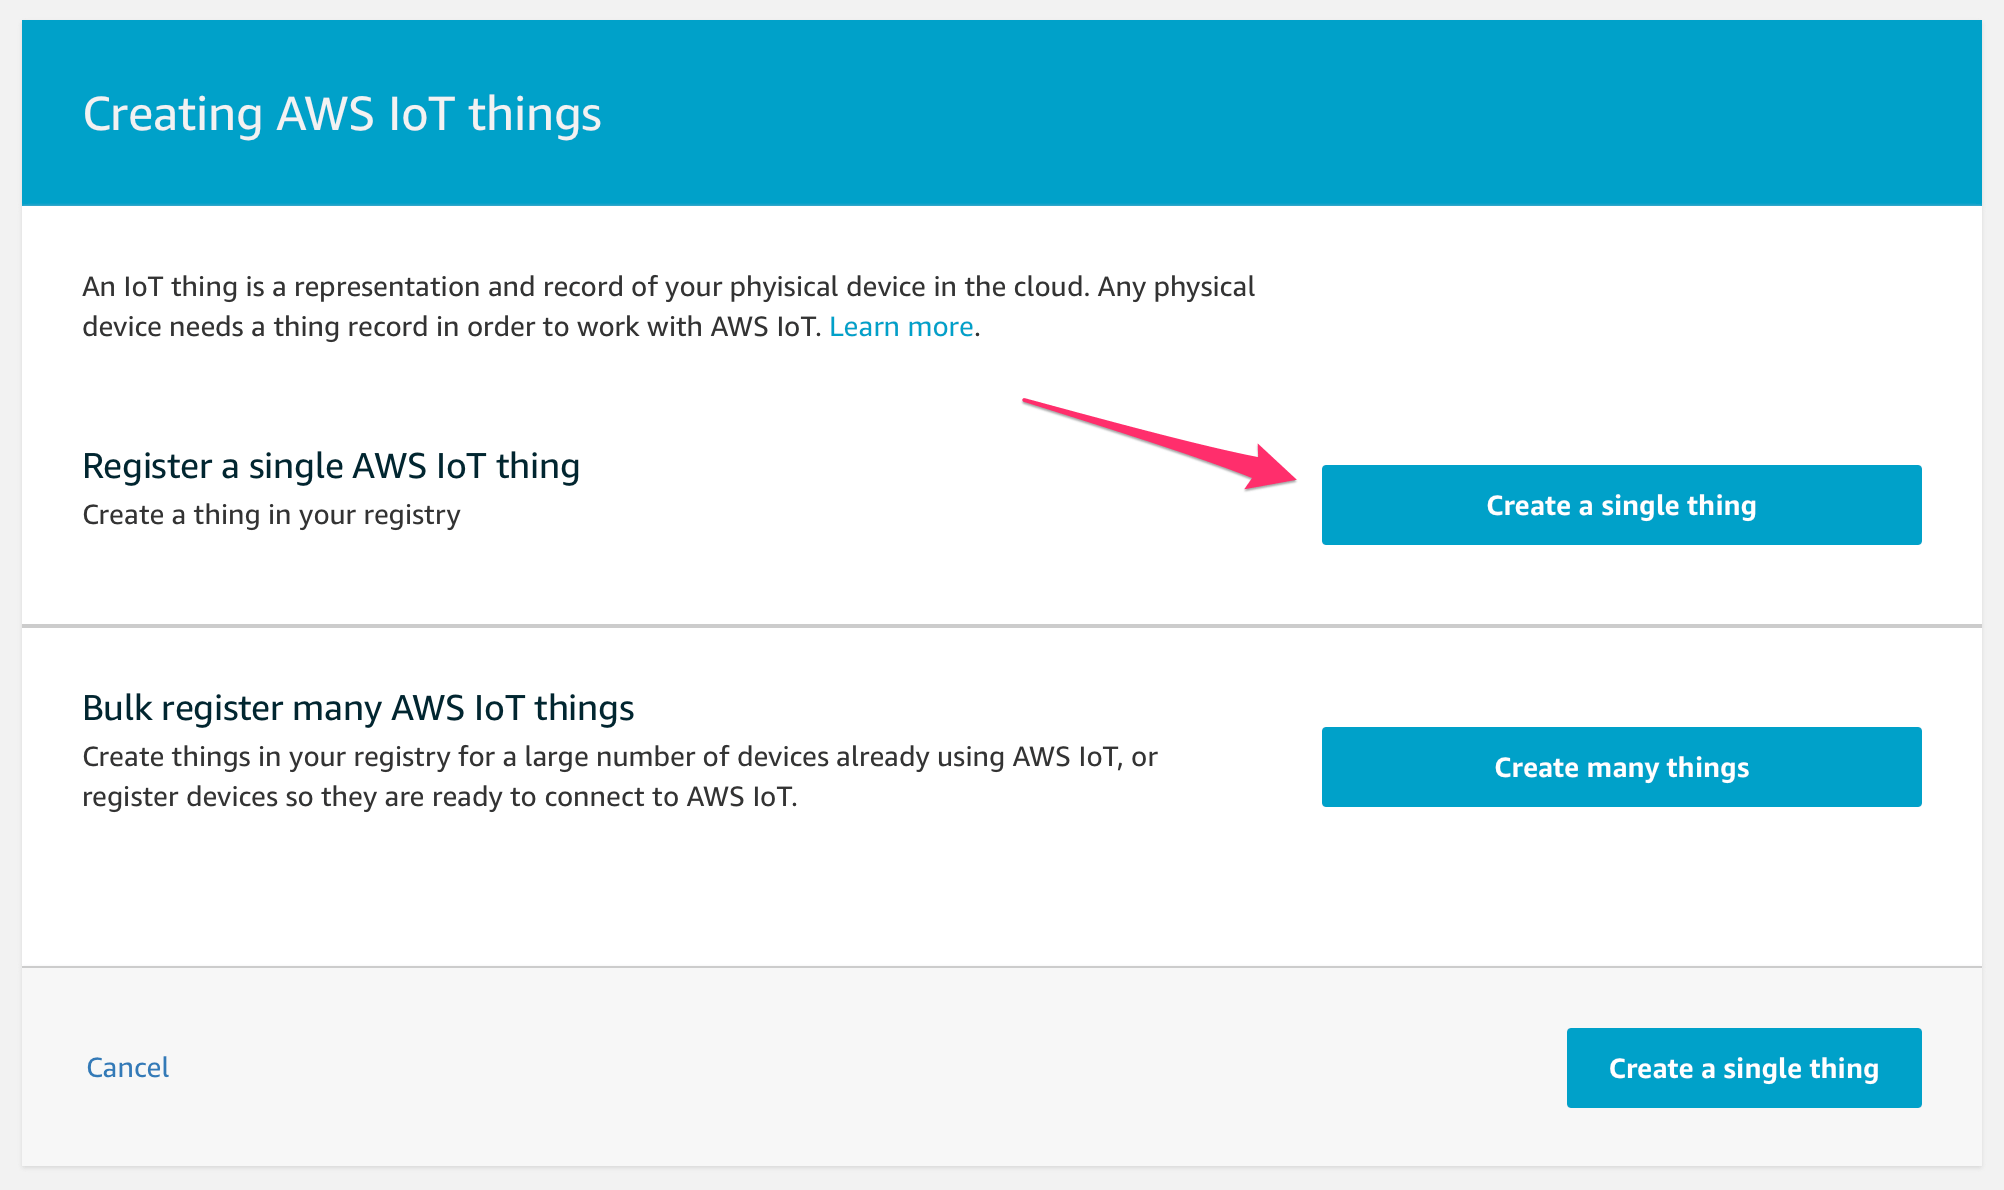
In this case, I will only create a single device, so click on "Create a single thing":
Give your device a name (write it down, you’ll need this later) and optionally give it a type and attach it to a group:

Next up we have to generate a certificate for our device so it can communicate with AWS is a secure manner. Click on "One-click certificate creation" (or be fancy and generate your on CSR):
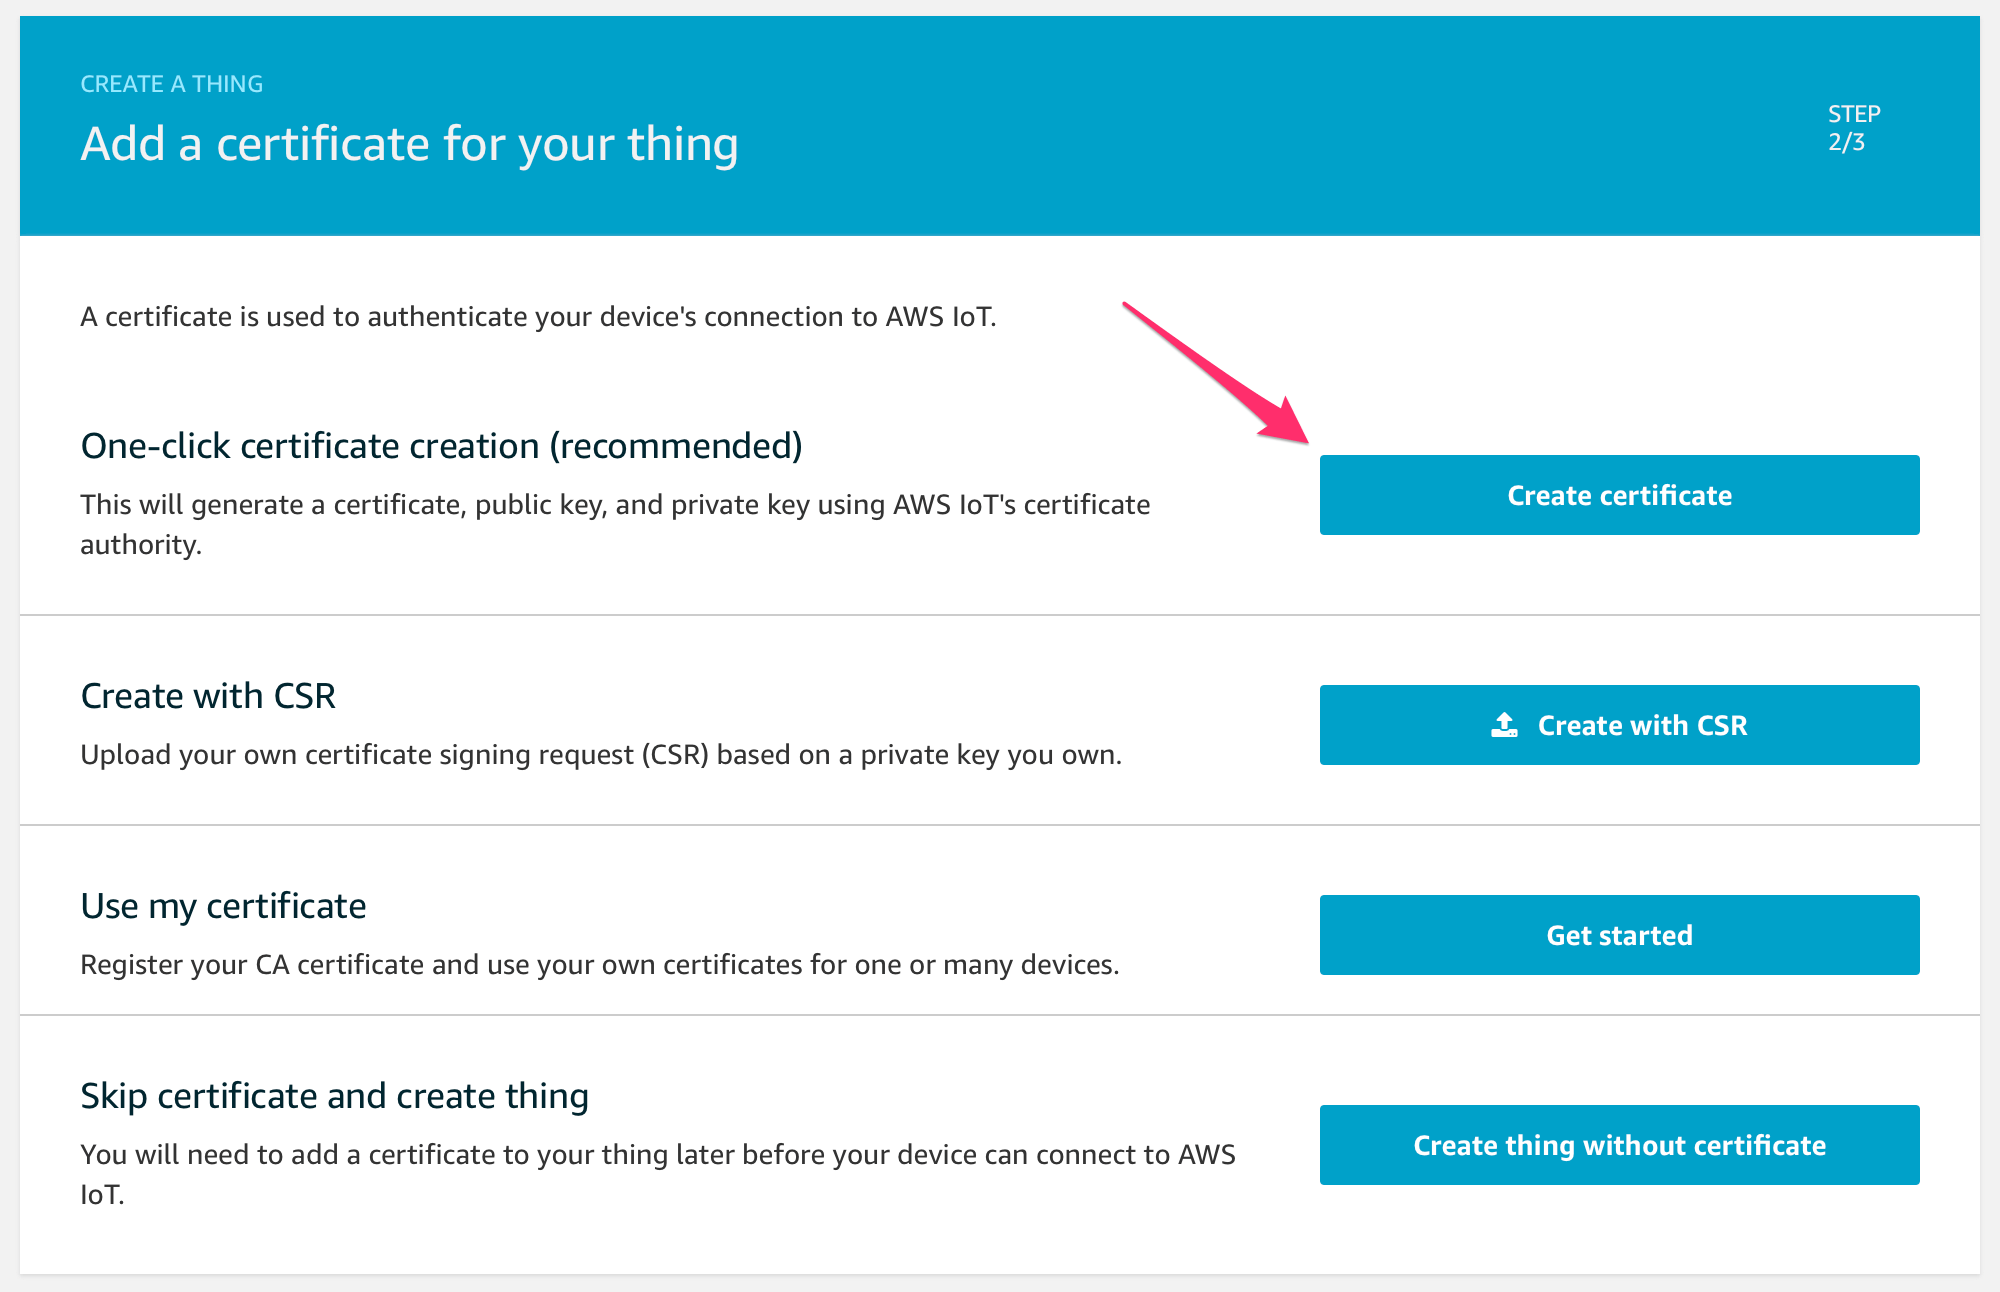
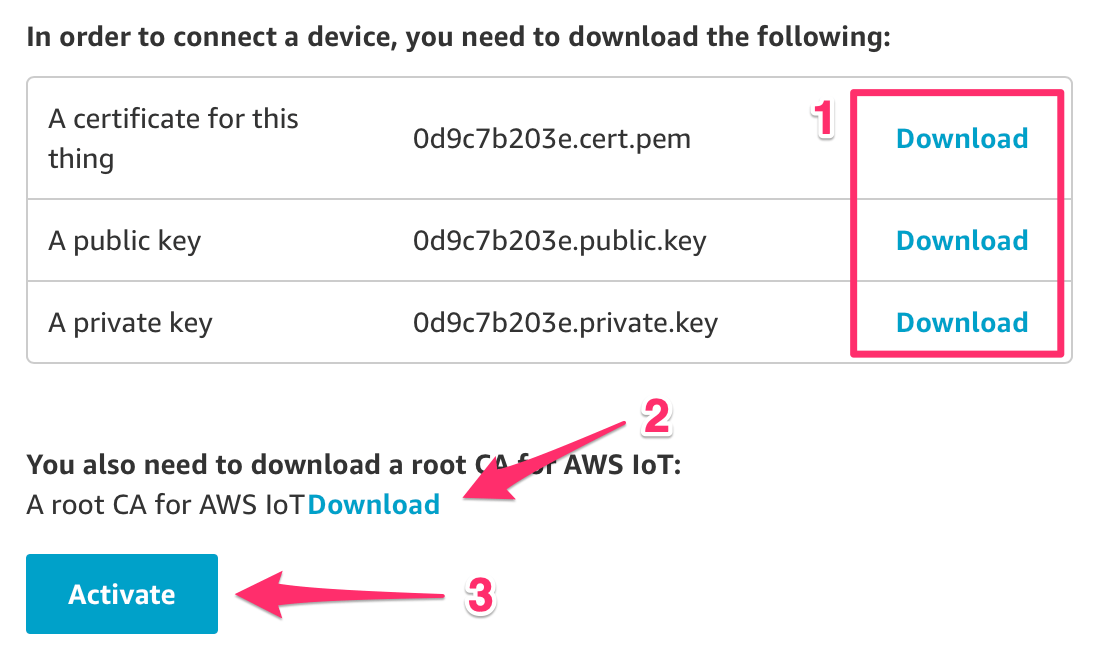
Amazon will now generate certificates for your device. Download each one (although the public key won’t be used) and also download the "root CA for AWS IoT". Also, don’t forget to click on the "Activate" button. Otherwise, you’ll end up with a device that can’t connect because its certificate is not active.
Next up: attaching a policy to the device. This policy will define what a device is allowed to do. By default, devices can’t do anything. Here is the policy that I use for almost all of my devices:
{
  "Version": "2012-10-17",
  "Statement": [
    {
      "Effect": "Allow",
      "Action": [
        "iot:Publish",
        "iot:Subscribe"
      ],
      "Resource": [
        "arn:aws:iot:eu-west-1:ACCOUNT_ID:topicfilter/${iot:Connection.Thing.ThingName}",
        "arn:aws:iot:eu-west-1:ACCOUNT_ID:topicfilter/${iot:Connection.Thing.ThingName}/*",
        "arn:aws:iot:eu-west-1:ACCOUNT_ID:topic/$aws/things/${iot:Connection.Thing.ThingName}/shadow/update"
      ]
    },
    {
      "Effect": "Allow",
      "Action": [
        "iot:Connect"
      ],
      "Resource": [
        "*"
      ],
      "Condition": {
        "Bool": {
          "iot:Connection.Thing.IsAttached": [
            "true"
          ]
        }
      }
    }
  ]
}
The policy allows devices to publish to MQTT topics that begin with their name and allows them to update their shadow document. It also checks if the device is connecting with a certificate that is attached to it. If not, the connection is refused.
Once the policy is added, click on "Register Thing" to finish the enrolment process:

Alright, the final step is to write down the URL of our MQTT endpoint. In the AWS IoT console, click on "Settings" in the bottom left corner. You’ll see your unique endpoint on the right.
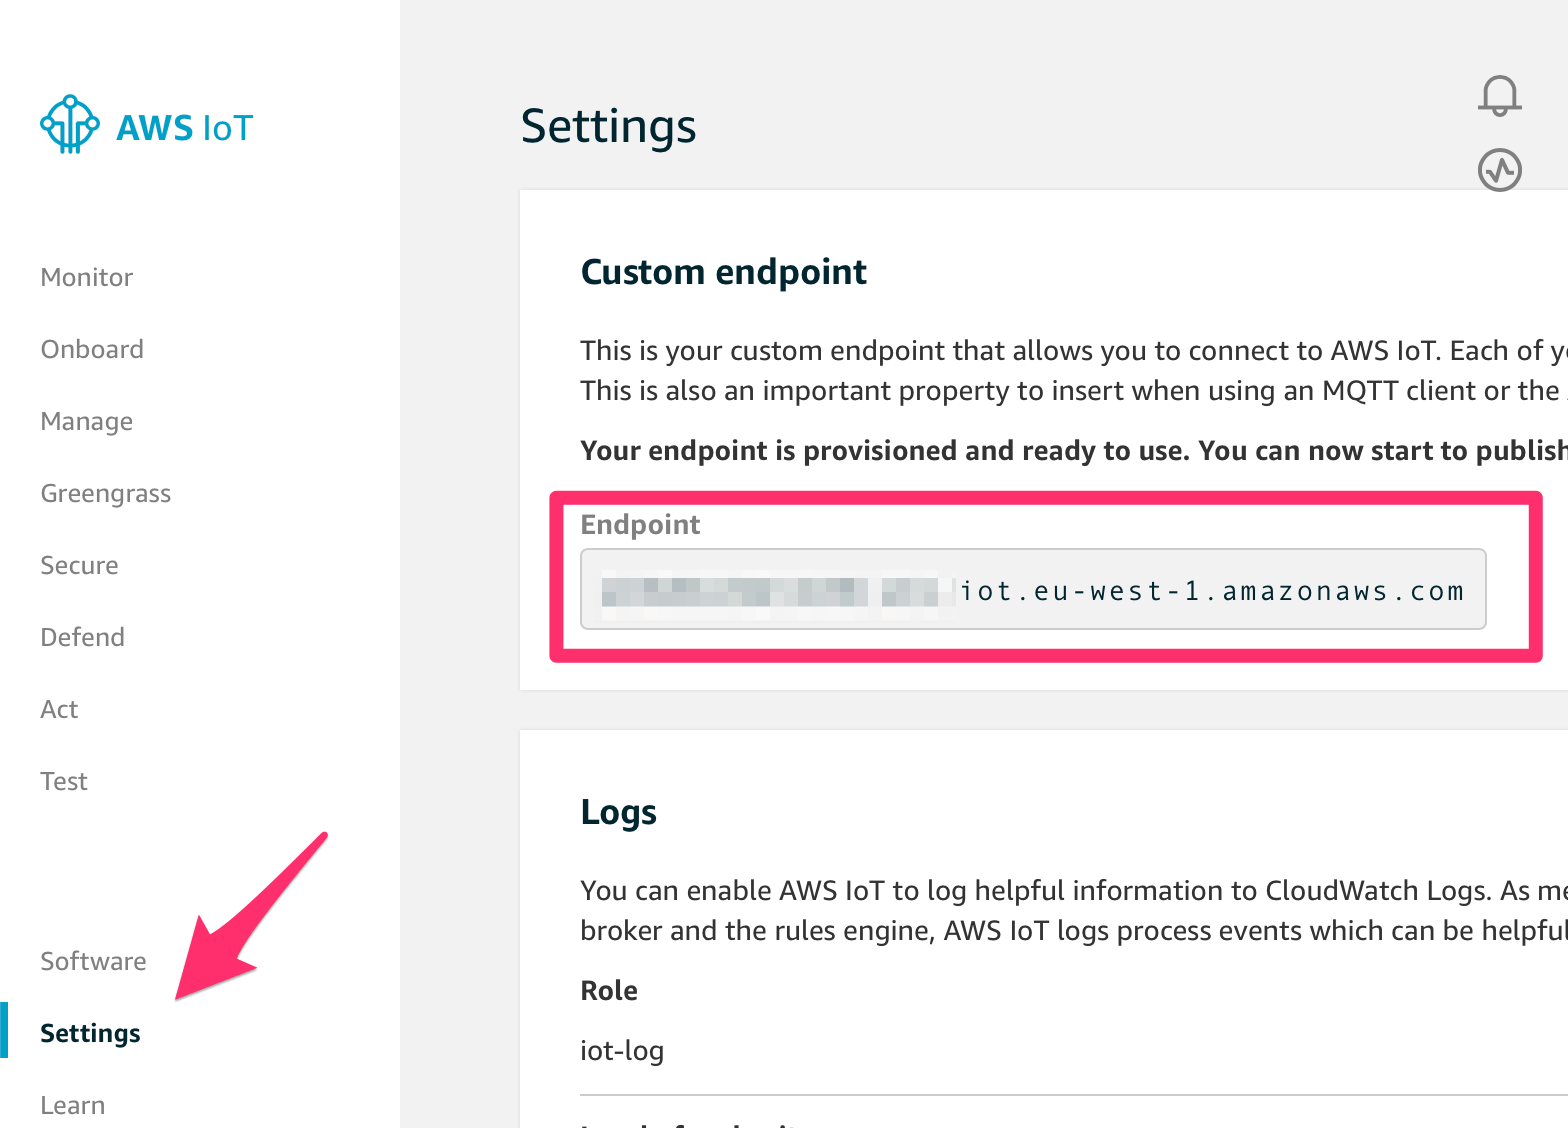
Side note: this endpoint is unique for your AWS account and is shared amongst all of your devices. If you want to connect multiple devices to AWS IoT you only need to perform this step once.
Encoding the certificates
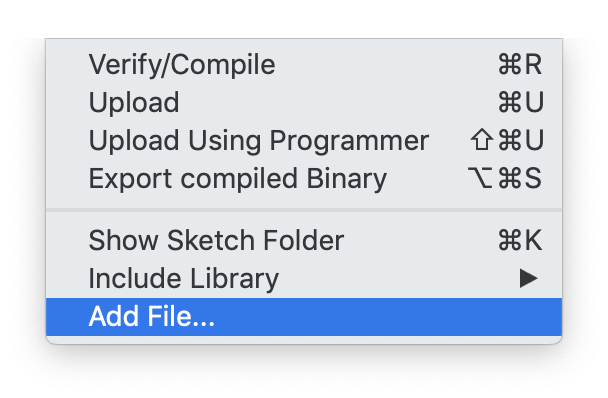
Now that we have the certificates for our device, we can add them to our Arduino sketch. I’d like to store them in a separate file, so I created a certs.h file by going to the "Sketch" menu and clicking on "Add File…". This step is entirely optional though.
Next, we’ll define three variables to store Amazon’s root CA AWS_CERT_CA, the private key of our device AWS_CERT_PRIVATE and the certificate of our device AWS_CERT_CRT. The public key that Amazon generated for our device is not needed.
#ifndef certs_h
#define certs_h

// Amazon's root CA. This should be the same for everyone.
const char AWS_CERT_CA[] = "-----BEGIN CERTIFICATE-----\n" \
"MIIDQTChkiG9w0CAimfz5m/jAo5gAwIBBgkqBAkPmljZbyjQsAgITBmy4vB4iANF\n" \
"ADA5MGQW1hem5sGQW1hemDVVUzEMQxBBDVhMQsYDVQQQGEwJQDExBBbWF6\n" \
"XXXXXXXXXXXXXXXXXXXXXXXXXXXXXXXXXXXXXXXXXXXXXXXXXXXXXXXXXX\n" \
"-----END CERTIFICATE-----\n";

// The private key for your device
const char AWS_CERT_PRIVATE[] = "-----BEGIN RSA PRIVATE KEY-----\n" \
"MIIEpQIQEAphsi45x87olzmdBqAOrHfZCADpJvguBAAKCZQDmHuAsjyoXwRxu9Xw\n" \
"Ywi735aadERdTgZL84y5cgvgoBsi+tKbmi2Atu9XzQb956B7kf51X0goBGNO4oeA\n" \
"XXXXXXXXXXXXXXXXXXXXXXXXXXXXXXXXXXXXXXXXXXXXXXXXXXXXXXXXXXXXXXXX\n" \
"-----END RSA PRIVATE KEY-----\n";

// The certificate for your device
const char AWS_CERT_CRT[] = "-----BEGIN CERTIFICATE-----\n" \
"MIIDwWH8yD0aOIBAgIUPCdJZxYDQYJKoZIhvcVfWTCCAkGgA65JHHAIAQEPMYwNL\n" \
"BQAwAdlYiBTZX2aWN1hFtYXpJ1UECcyBPTTFLMem9uIFEkGwxCQWvbi5lPUjb20g\n" \
"XXXXXXXXXXXXXXXXXXXXXXXXXXXXXXXXXXXXXXXXXXXXXXXXXXXXXXXXXXXXXXXX\n" \
"-----END CERTIFICATE-----\n";

#endif
Note that the certificates have to be encoded in a certain way. To do that, I opened them up in Sublime Text and a quote at the beginner of each line and \n" \ at the end of each line.
Don’t forget to include the certs.h file in your main sketch if you opted to put them in a separate file:
#include "certs.h"Connecting to AWS IOT (via MQTT)
Armed with the certificates, we can now connect to AWS via MQTT! I’ll start by defining some configuration variables in the main sketch file:
// The name of the device. This MUST match up with the name defined in the AWS console
#define DEVICE_NAME "my-arduino-device"

// The MQTTT endpoint for the device (unique for each AWS account but shared amongst devices within the account)
#define AWS_IOT_ENDPOINT "xxxxxxxxxxx.iot.eu-west-1.amazonaws.com"

// The MQTT topic that this device should publish to
#define AWS_IOT_TOPIC "$aws/things/" DEVICE_NAME "/shadow/update"

// How many times we should attempt to connect to AWS
#define AWS_MAX_RECONNECT_TRIES 50
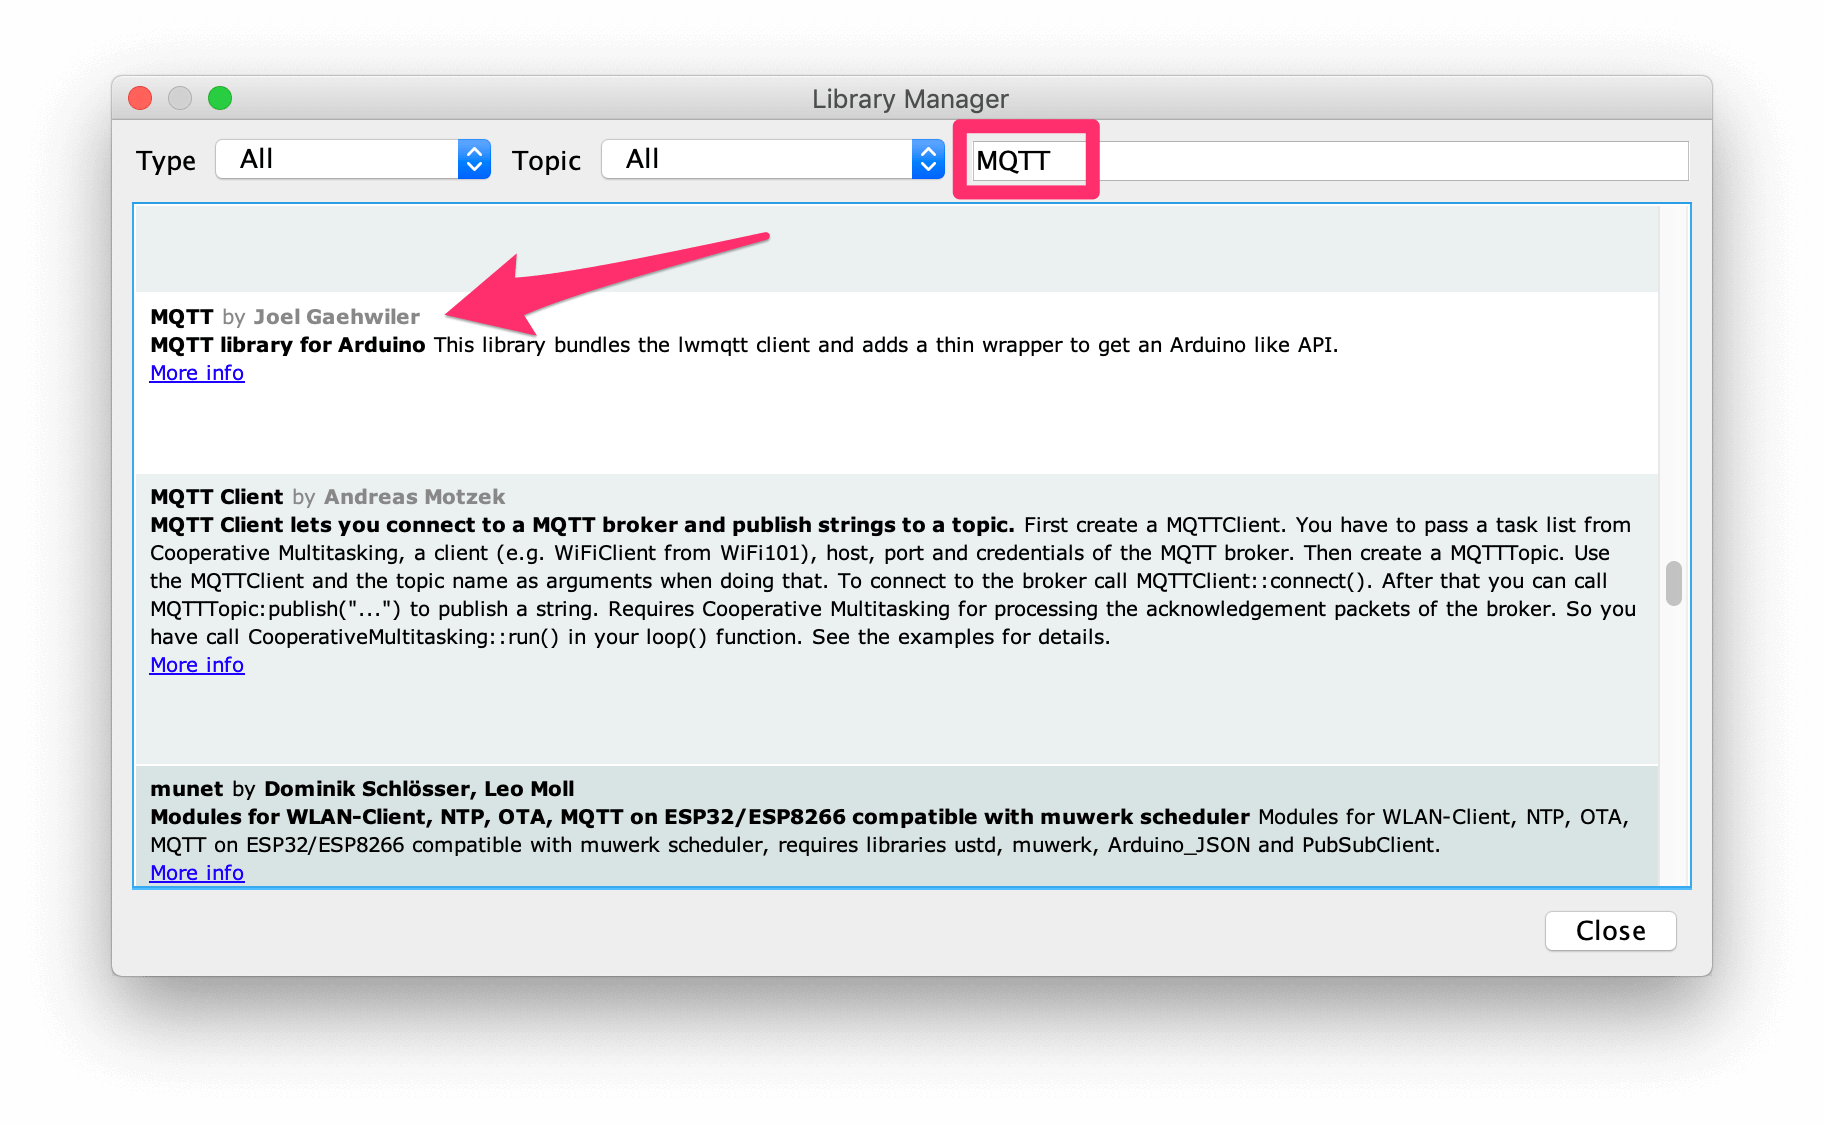
We also need to install an MQTT library. There are many available for Arduino, but I found the one from Joel Gaehwiler to work best. You can install it through the Arduino Library Manager:
Next, we can create two instances. WiFiClientSecure which will be responsible for handling the encryption with our certificates and MQTTClient which will actually "speak" MQTT protocol with AWS:
#include <WiFiClientSecure.h>
#include <MQTTClient.h>

WiFiClientSecure net = WiFiClientSecure();
MQTTClient client = MQTTClient();
Side note: by default the maximum size of packets that you can publish and receive is set to 128 bytes. To increase it, you can use this instead:
MQTTClient client = MQTTClient(512);Now we’re ready to establish our MQTT connection with AWS! I again prefer to put this logic in a separate function:
void connectToAWS()
{
	// Configure WiFiClientSecure to use the AWS certificates we generated
	net.setCACert(AWS_CERT_CA);
	net.setCertificate(AWS_CERT_CRT);
	net.setPrivateKey(AWS_CERT_PRIVATE);

	// Connect to the MQTT broker on the AWS endpoint we defined earlier
	client.begin(AWS_IOT_ENDPOINT, 8883, net);

	// Try to connect to AWS and count how many times we retried.
	int retries = 0;
	Serial.print("Connecting to AWS IOT");

	while (!client.connect(DEVICE_NAME) && retries < AWS_MAX_RECONNECT_TRIES) {
		Serial.print(".");
		delay(100);
		retries++;
	}

	// Make sure that we did indeed successfully connect to the MQTT broker
	// If not we just end the function and wait for the next loop.
	if(!client.connected()){
		Serial.println(" Timeout!");
		return;
	}

	// If we land here, we have successfully connected to AWS!
	// And we can subscribe to topics and send messages.
	Serial.println("Connected!");
}
At this point, we should have an open connection with AWS ready to send or receive messages.
Sending JSON with ArduinoJson
The final step is to use our MQTT connection to send some data to AWS! The most common way of doing this is by updating the device’s "Shadow document". This is a special feature that AWS designed with IoT devices in mind.
In a nutshell, each device has two states: a reported and a desired state. The reported state is used by the device to keep track of its current state, while the desired state is used to change something.
A simple example: imagine you have an LED light that is connected to AWS IoT. It’s currently turned off, so the reported state is set to false. When you want to turn it on, you set the desired state to true. Amazon will now see that the states don’t match up and they will send a message to the device, letting it know that it should turn on.
Let’s now imagine that we’re building a weather station and that we want to use the "reported" state to keep track of a bunch of sensors. We would need to construct the following JSON and publish it to the /shadow/update MQTT topic:
{
	"state": {
		"reported": {
			"temperature": 23.76,
			"humidity": 78.12,
			"wifi_strength": -87.27,
			"location": {
				"name": "Garden"
			}
		}
	}
}
We could, of course, make this JSON document by concatenating strings together, but let’s not do that to ourselves. Instead let’s use the ArduinoJson library. You can install it through the Library Manager like detailed before:
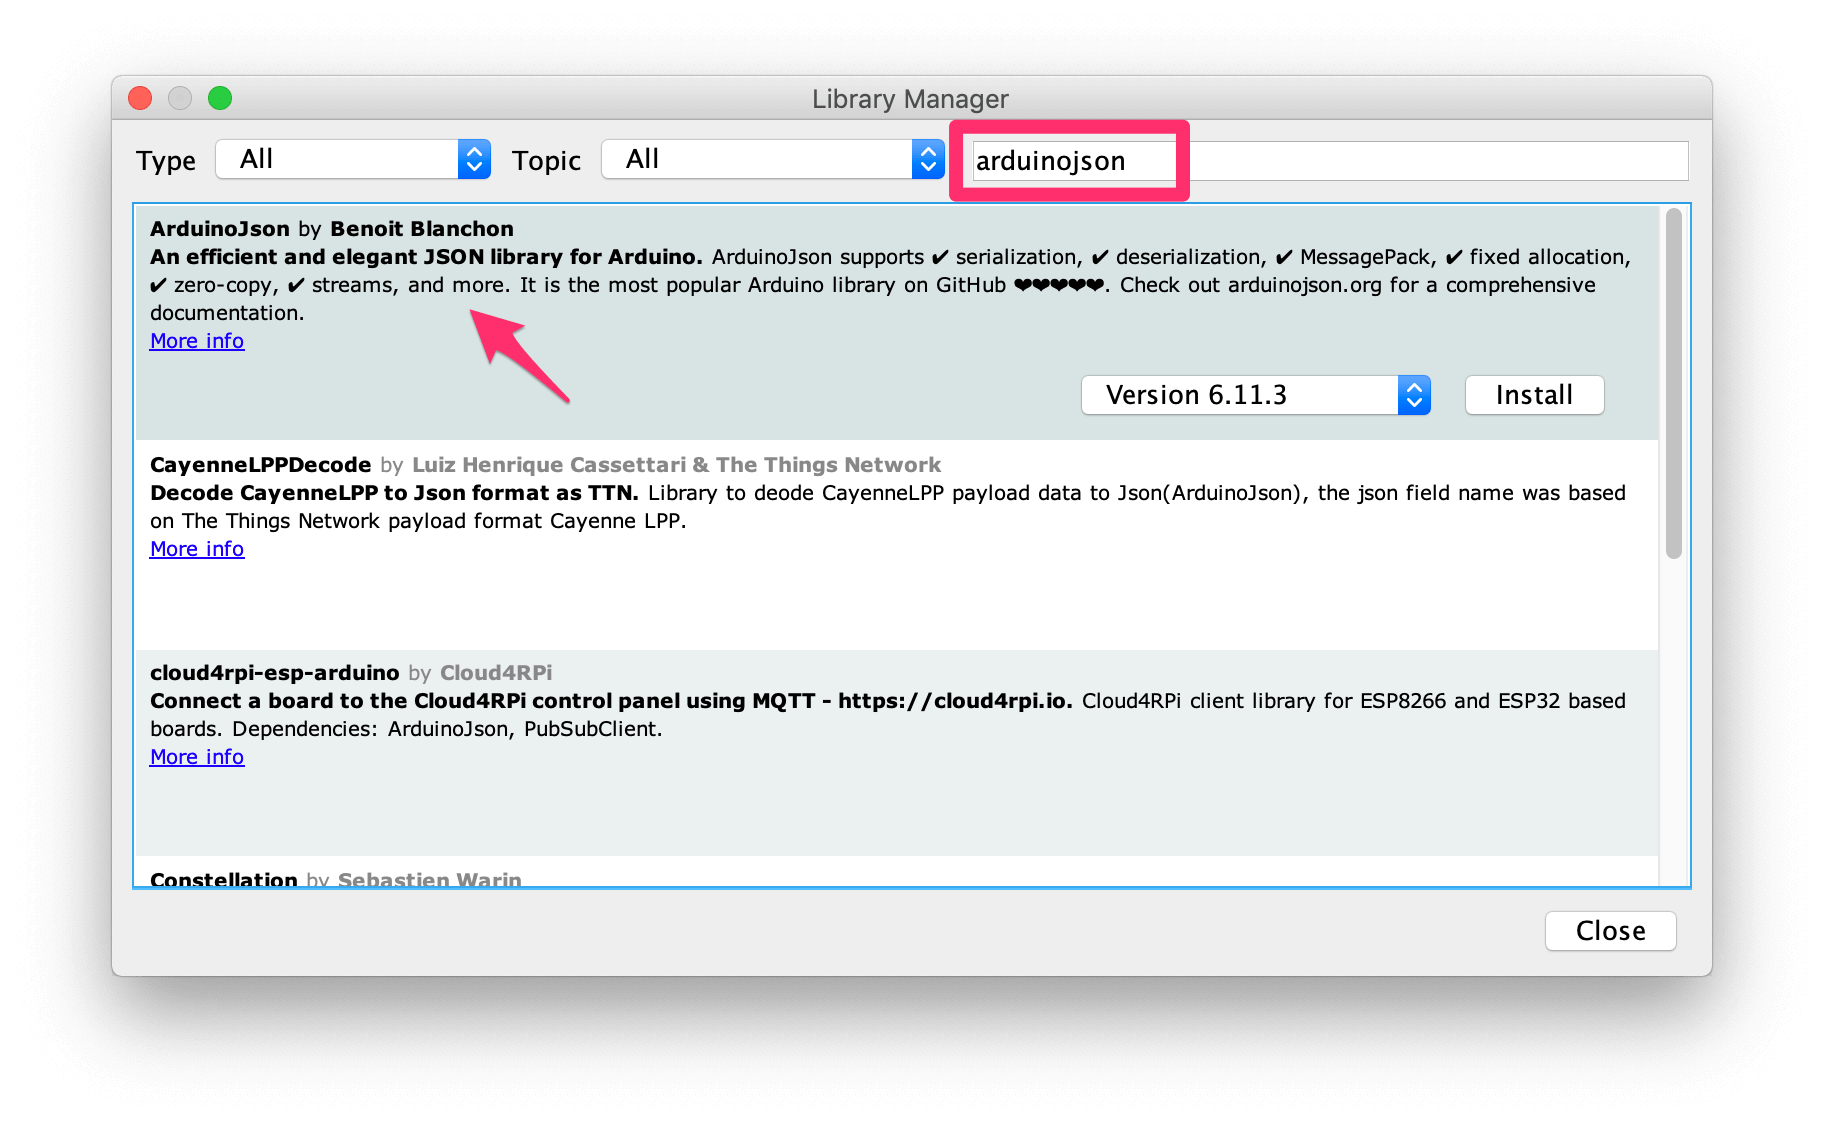
With that library we can recreate the JSON document like so:
#include <ArduinoJson.h>

void sendJsonToAWS()
{
  StaticJsonDocument<512> jsonDoc;
  JsonObject stateObj = jsonDoc.createNestedObject("state");
  JsonObject reportedObj = stateObj.createNestedObject("reported");

  // Write the temperature & humidity. Here you can use any C++ type (and you can refer to variables)
  reportedObj["temperature"] = 23.76;
  reportedObj["humidity"] = 78.12;
  reportedObj["wifi_strength"] = WiFi.RSSI();

  // Create a nested object "location"
  JsonObject locationObj = reportedObj.createNestedObject("location");
  locationObj["name"] = "Garden";

  // Publish the message to AWS
  client.publish(AWS_IOT_TOPIC, jsonBuffer);
}
A few interesting things are going on that you might want to know. For starters, the size of the JSON document is limited by the size of the StaticJsonDocument. In this case, the buffer is 512 bytes in size. Increase or decrease this value as needed (and remember that increasing the size of the JSON document, likely means that you have to increase the MQTT buffer size as well)
StaticJsonDocument<512> jsonDoc;Adding fields to the object is very simple, just use the array notation. ArduinoJson will look at the C++ type to figure out how it should encode your data into a valid JSON document. Cool!
reportedObj["myVariableName"] = "MyValue";If you want to see the resulting JSON on the serial console, you can use the serializeJson method:
serializeJson(jsonDoc, Serial);Loop/Setup function
We’re done! We have created all the functions we need to establish a connection with AWS, construct a JSON object and send it.
Here is how your setup and loop functions could look like:
void setup() {
  Serial.begin(9600);
  connectToWiFi();
  connectToAWS();
}

void loop() {
  sendJsonToAWS();
  client.loop();
  delay(1000);
}
Note the client.loop() line. This is essential to keep the MQTT connection with AWS alive.
Starter template on GitHub
I’ve published this example as a complete starter kit on GitHub. Check it out here: https://github.com/Savjee/arduino-aws-iot-starter-template
Conclusion
At first sight, setting up and using AWS IOT with an ESP32 seems like a lot of work. You need to create special certificates, connect to WiFi, set up a secure MQTT connection and construct a JSON message. However, if you take it step by step, things are not so complicated.
I hope that this tutorial has cleared everything up. So, what are you waiting on? Go build some cool IoT stuff with an ESP32 and AWS ;) Also let me know in the comments what IoT devices you’re working on and how they’ll benefit from a setup like this.

