Deploying websites to FTP or Amazon S3 with BitBucket Pipelines
Last week Atlassian announced a new feature for BitBucket called Pipelines. It’s a continuous integration service that is integrated into BitBucket and is powered by Docker. I immediately signed up for the closed beta and received my invite shortly afterwards, yay!
I wondered if BitBucket Pipelines could replace my Jenkins server. I mostly use Jenkins to automate the deployment of websites to a FTP server and to Amazon S3. In this post I’ll show you how to configure BitBucket Pipelines to deploy your website to a FTP server or to Amazon S3 (with s3_website).
Enable BitBucket Pipelines
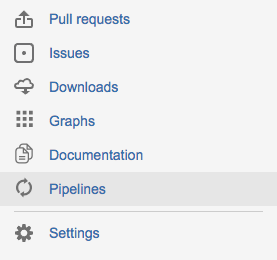
The first thing you need to do is enable BitBucket Pipelines for your project. This has to be done for every project where you want to use Pipelines. Go to the left column and open up “Pipelines”. Obviously this is only available if you have been invited to the beta.

After opening up the Pipelines section, BitBucket will show you a short message explaining what the service is all about. Continue by clicking on “Set up Pipelines”. This reveals the actual settings for Pipelines. BitBucket helps us out here and shows a 3-step process to enable and configure your pipeline:
- Enable the pipelines
- Copy the sample configuration to your clipboard
- Click on the "create bitbucket-pipelines.yml" button

This will create a new file in the root of your repository called bitbucket-pipelines.yml. This file controls:
- the Docker image that should be used to run your tests in,
- for which branches the CI should be triggered
- and what steps it should go through.
After clicking the "create bitbucket-pipelines.yml" button, BitBucket will automatically open up the editor so you can paste their sample configuration file in it. But before you commit this sample configuration file, let’s change it!
Config file for FTP deployments
To deploy a website to an FTP server, I use git-ftp. It's a wonderful tool that allows you to upload only changed or removed files to an FTP server. I have previously used this tool with Jenkins as well!
So I modified two parts of Pipelines configuration file. First of all, I choose to use the debian-git Docker image because it already has git installed and because I'm somewhat familiar with Debian. And secondly, I defined the steps that Pipelines should run through:
- Let apt-get update its list of packages.
- Install the
git-ftp packageinto the Docker container. - Run the
pushfunction of git-ftp to deploy the changed files to the server. Note that before you can dopush, you should have done aninitfirst. The git-ftp program needs a username and password to connect to your FTP account.
Here is my full bitbucket-pipelines.yml file for FTP deployments:
image: samueldebruyn/debian-git

pipelines:
  default:
    - step:
        script:
          - apt-get update
          - apt-get -qq install git-ftp
          - git ftp push --user $FTP_USERNAME --passwd $FTP_PASSWORD ftp://YOUR_SERVER_ADDRESS/PATH_TO_WEBSITE/
Don’t commit this file just yet and open a new tab instead! Note that I use environment variables to store the FTP username and password. I’ll later show you how to define these variables in BitBucket.
Config file for s3_website
For deploying a static website to Amazon S3 I have this bitbucket-pipelines.yml configuration file:
image: attensee/s3_website

pipelines:
  default:
    - step:
        script:
          - s3_website push
I’m using the attensee/s3_website docker image because that one has the awesome s3_website tool installed. The configuration file of s3_website (s3_website.yml) looks something like this:
s3_id: <%= ENV['S3_ID'] %>
s3_secret: <%= ENV['S3_SECRET'] %>
s3_bucket: bitbucket-pipelines
Just as with the FTP configuration file: don’t commit this file just yet! We have to define the environment variables S3_ID and S3_SECRET first.
Environment variables
"Wait a minute Xavier!", you might say. "I’m not going to commit my credentials to my git repository!". And you would be correct. Committing sensitive credentials to git repositories is never a good idea. Instead you can use environment variables to store credentials outside of your git repository.
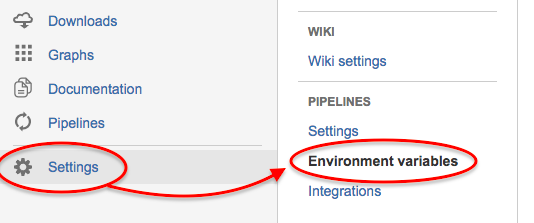
- Go to the Settings of your repository
- Open the "Environment variables" page under the Pipelines section.

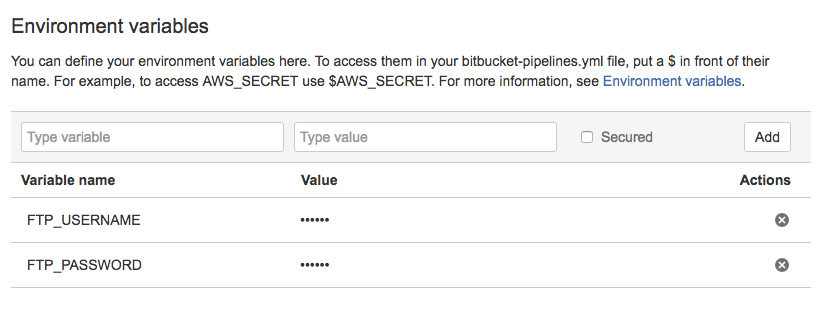
Here you can define environment variables that will be accessible to your scripts when a new build is triggered. BitBucket has support for unsecured and secured variables. The difference being that secured variables hide their value in the web interface (ideal for passwords).
For FTP you should define these two variables:
- FTP_USERNAME
- FTP_PASSWORD
For deploying to Amazon S3 with s3_website you’ll need:
- S3_ID
- S3_SECRET

In case you’re wondering: they don’t have to be in caps, but it’s sort of a convention for environment variables.
Triggering a build
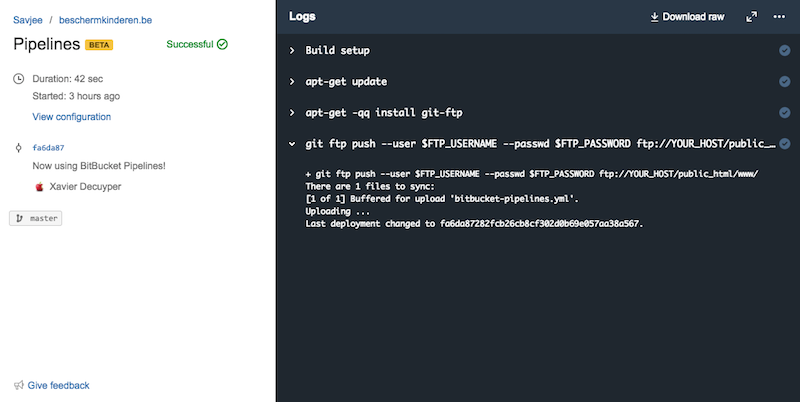
Triggering a build is as easy as making a commit to your git repository. After each commit BitBucket will run through all the steps that you’ve defined in bitbucket-pipelines.yml. You can see the status of your builds at any time by going to the Pipelines section. Here you’ll find an overview of all the previous builds and you can see more detailed information for each build, including a console output of the Docker container which was used to run your pipeline.

Conclusion
BitBucket Pipelines is already a great service in my eyes. However there is one thing to consider: the price. Right now Pipelines is freely available during the beta with limits on how long you can keep your tasks running. Atlassian does note that it will communicate detailed pricing information later on. I wouldn’t be surprised if they would limit the free features of this service.
Anyway, for now BitBucket Pipelines is a great replacement for my Jenkins server. I’ve moved over all my Jenkins jobs to this platform and they are working wonderfully. I’m not ditching Jenkins just yet though!


